About Me

My photo

Independent
Close to my Heart
Consultant

Contact me today to schedule your home gathering or place an order!

Tuesday, June 30, 2015

Stamp of the Month Blog Hop -- July: Life Is Wonderful


Welcome to the July Stamp of the Month Blog Hop!

If you came from visiting Nikka Geers, then you are in the right place.  If you just happened upon my little corner of the blog world, simply start here and continue hopping until you return here -- our fun hop is one big loop for your viewing pleasure. 

The month's featured stamp set is S1507 Life is Wonderful (pictured below).  This set is only available until July 31st and is only $5 with a $50 Close to My Heart purchase.


 For today's layout, I used another sketch I found on Pinterest.  I've been loving sketches lately -- now that Summer is here, I don't have as much time in my studio, and sketches help me get layouts done on my shortened time frame.


I plan to add pictures to my layout from my cousin's recent baby shower.  Her husband came and took lots of photos so I'm waiting for him to share them before deciding which ones to print. I knew I wanted the focus to be on the pictures so I kept the embellishments simple and followed the sketch closely.


Supplies used:
*Life is Wonderful stamp set -- July SOTM
*Shower Flowers stamp set
*Blossom paper packet
*White Daisy cardstock
*Glacier cardstock
*Lagoon Exclusive Inks stamp pad
*Smoothie Exclusive Inks stamp pad
*Sunset Exclusive Inks stamp pad
*Teal shimmer trim
*Oceanside sequins
*Buttons from my stash

To order these or any of our other fabulous Close to My Heart products, please visit http://jddesigns.ctmh.com.

Thank you for visiting me at JD Designs and for hopping with us on the Close to My Heart Stamp of the Month July Blog Hop!   Next up on the hop is Brenda LappI hope you'll hop on over to her blog for more inspiration.

Until next time, happy crafting!

Monday, June 29, 2015

Babies Bring Lots of Joy... and Cards!


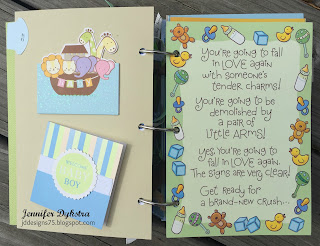
After creating my son's birthday card book (post here), I also created this baby-themed card book to house all the cards from my baby showers, my son's birth, and his baptism.  I used a tag punch from my stash and my mini stapler to add file tabs to each divider page that I labeled with the event at which I received the cards.

Front Cover

Tabbed Dividers

Inside Front Cover

For smaller cards, I simply used my ATG to adhere the backs to the divider -- thus still allowing them to be opened.

Inside Back Cover

Back Cover

SUPPLIES USED

*Chipboard
*DCWV Baby Boy 2 stack
*2" binder rings
*Tag punch
*Close to My Heart Mini Stapler
*1" circle punch
*1" round clear epoxy stickers


Happy Crafting!
Jennifer

Saturday, June 27, 2015

Sweet Birthday Wishes & Wet Pup Kisses


Today we are celebrating my son's 4th birthday with family and friends.  He is super excited as he loves having people over to "his" house, and he chose a Paw Patrol themed party.

Today's project is one that has been on my mental project list for a while now.  It will be an on-going labor of love for years to come and solves the problem of what do you do with all the cards your kids receive over the years for birthdays, holidays, and other occasions.  Like I do with our family Christmas cards each year, I made covers and put the cards into a book.  Unlike our Christmas book, this one has much larger rings, and I will add a new divider each year to separate one year's cards from the next.

To make the covers, I cut a piece of chipboard using my paper trimmer (my Cricut would not cooperate!) and sandwiched it between two pieces of cardstock from the DCWV Celebration stack.  Then I measured where I wanted the holes with my 3-hole punch and punched them with a hand punch.

Once the covers were completed, I used my 3-hole punch to punch each card as well as the dividers which I made using pieces of solid-colored cardstock.

Front Cover
(I used the cut apart sheet from the paper collection and more DIY flair.)
Inside Front Cover
Inside Back Cover
Back Cover

SUPPLIES USED

*Chipboard
*DCWV Celebration stack
*2" binder rings
*1" circle punch
*1" round clear epoxy stickers


Hope you have a fabulous weekend.  See you next week for another fun Stamp of the Month Blog Hop.

Happy Crafting!
Jennifer

Monday, June 15, 2015

Shutterfold Surprise for Grandma


Happy Birthday, Grandma!!

Today's card was made especially for my grandma.  She lives in Arkansas, and I don't see her nearly as often as I would like.  Today is her birthday.  We were blessed to be able to spend her birthday together last year, but this year, we won't see her.  So I sent her this cheery card and will call her later with birthday wishes.

I like to try new card techniques each year for Grandma's card.  Last year, I made an A2-sized Box Card.  This year, I went with a Gatefold Shutter card

Card Front

Card and Removable Belly Band

Card Slightly Opened

Card with Shutter Fully Opened to Reveal Inner Sentiment


DIMENSIONS
*Card Base (1) -- 5 1/2" x 8 1/2", scored at 2 1/8" and 6 3/8"
*Shutter pieces (2) -- 3 1/2" x 4", scored at 1/2", banner-flagged about 2" up the center
*Inside Layers (1) -- Cardstock 3 x 5 1/2, B&T paper 2 3/4" x 5 1/4"
*Outside Layers (2) -- Cardstock 5 1/4" x 1 7/8", B&T paper 5" x 1 5/8" 
*Belly Band -- Cardstock 1" x 12", B&T paper 1/2" x 12"


TUTORIAL
  1. Score card base at 2 1/8" and 6 3/8", fold sides into center, and burnish with bone folder.  This will create your gate fold.
  2. Adhere the inside layer pieces together.  Then punch with 2 1/2" circle punch (or use Cricut & Centerpoint feature to achieve same look),  Add punched panel to center of card base with foam tape.
  3. Score shutter pieces at 1/2".  Create banner flag on side opposite score line by cutting a 2" line straight up the center of the paper and then cutting from each corner to the center point.  Fold the 1/2" strip towards the flag end, and apply adhesive (tape runner, sticky strip, etc.) to the outside of the flap.  Attach along the card base score lines with the flag ends pointing towards the center of the card and the 1/2" score line pointing away from the card base; adhere the 1/2" strip to the sides of the card base.  Carefully tuck the flag ends under the inside layer piece to create the shutter.
  4. Adhere the outer layer pieces and attach the panels to either side of the card front.
  5. Adhere the belly band pieces together and wrap around the center of the card -- do not wrap the band too tight as you will not be able to slide on/off card easily.  Use bone folder to create a firm crease at the folds.  Attach the ends in the front of the card.
  6. To cover the seam of the belly band, layer a 2 1/4" scallop circle onto a 2 1/2" circle.  (I used the cardstock side of the circle I cut from the inside layer panel.)  Be sure to stamp your sentiment on the scallop circle before applying to the plain circle.  Attach to your belly band, covering the seam.
  7. Remove the belly band and open the card, laying flat so the shutters are completely open.  Carefully stamp an additional greeting or image inside the shutter blank space for an added surprise when the shutter opens.  (It's important to do this after the shutter panels have been adhered to the card so you can align the inner stamping with the shutter blank space.

SUPPLIES USED

*Blossom Paper Packet
*Whisper White cardstock
*Black cardstock
*Lagoon cardstock
*Pear cardstock
*Hollyhock Exclusive Inks stamp pad
*Pear Exclusive Inks stamp pad
*Sponge
*Foam Tape
*Non-stick Micro Tip Scissors

*2 1/2" Circle Punch
*2 1/4" Scallop Circle Punch


To order these or any of the other fabulous CTMH products, please visit my online store at jddesigns.ctmh.com.

Until next time, happy crafting!


Thursday, June 11, 2015

Family Brings Me Joy

Have you ever visited the Close to my Heart Make It From Your Heart blog?  If not, you are missing out, my friend!  The ideas they share are simply fabulous.  CTMH goes above and beyond when providing inspiration and project samples.  Not only do they create amazing Workshops on the Go for every paper collection and share additional projects with instructions to consultants only, they also share project after project on the MIFYM blog.
Whenever new paper collections are released, they typically do a post with 2-3 additional scrapbook layouts for each collection.  These layouts will typically feature the Complements embellishment packs which are sold separately from the Workshops on the Go.  In addition, most layouts are created based on one of the patterns in our fantastic How-to Programs.  I simply love seeing how CTMH uses these great products.  Many times I'm inspired to pull out my personal copy of our How-to Program and create my own artwork.  Other times, I love their design so much I simply CASE it for myself -- as was the instance with the layout I'm sharing today.

This layout was featured on the CTMH blog on April 2nd.

Here's my version.  I changed the title and omitted the stitching.  I also embellished my layout a little differently as I didn't have all the same embellishments remaining in my stash.

SUPPLIES USED

*Blossom Paper Packet
*Blossom Complements
*Glacier cardstock
*Lagoon cardstock
*Sunset cardstock
*Oceanside Sequins
*Glacier Extra Thick Twine
*Make It From Your Heart, Volume 1

To order these or any of the other fabulous CTMH products, please visit my online store at jddesigns.ctmh.com.

Until next time, happy crafting!


Monday, June 8, 2015

Quick & Easy Cards with Washi Tape


I recently saw a super simple, yet cute, washi tape card on Pinterest.  I absolutely love simple cards like this.  They are great for those last-minute, I-need-a-card-now moments.  Simply grab a few rolls of coordinating washi tape and a sentiment stamp... and voila!  You are ready to go.  This card was so quick that I made three variations in a matter of minutes.  What do you think?


SUPPLIES USED

*Finding the Words stamp set (my newest favorite!!)
*White cardstock
*Black Exclusive Inks stamp pad

*Scotch Expressions washi tape -- Silver Bubble Dots, Gold Vintage Rose, Gold, Cracked, Green/White Swiss Dots, Big Zig
*SpiegelMom Scraps washi tape -- Wavy Pretty in Pink, Light Grey Little Chevies


To order any of CTMH's fabulous products, please visit my online store at jddesigns.ctmh.com.

Until next time, happy crafting!


Thursday, June 4, 2015

That's the Same Kind of Thing


I've been working to use up random items in my studio.  So while my number one love is (and will continue to be) Close to my Heart, you may start seeing non-CTMH products popping up more often in my posts.  For example, the background paper on the card below.  I found this polka dot ombre scrap last week and wanted to use it.  I love the way faded ombre allowed me to stamp this fun sentiment from this month's Stamp of the Month set, Ice Cream Dream.


Supplies used:
*Ice Cream Dream (June SOTM)
*Kraft cardstock
*Slate Exclusive Inks stamp pad
*Pixie Exclusive Inks stamp pad
*Flamingo Dots
*Blending Pen

I am absolutely loving this fun stamp of the month set.  It just screams Summer and makes me want to chase down the ice cream man or head to the nearest ice cream shop.


To order these or any of our other fabulous Close to My Heart products, please visit http://jddesigns.ctmh.com.

Until next time, happy crafting!

Monday, June 1, 2015

June Close to my Heart Specials


Summer Crush Constant Campaign

During the month of June, when you purchase any My Crush™ book and its accompanying assortment pictured in Annual Inspirations 2014–2015, you will receive the coordinating stamp set FREE! That is a savings of at least $9.95 USD.  Choose from five lovely My Crush book offerings that will provide a swoon-worthy background for your favorite memories. From family reunions to camping adventures to holiday countdowns—and much more—you will be crushing on all these books and the possibilities they provide. Every My Crush book features a hard cover with wire binding and cardstock-weight pages that are printed with eye-catching designs to form the perfect bases for your memory keeping. Additionally, each My Crush book also features unique details—from glossy print, to vellum pages, to gold foil, to ink-resistant patterns—that make displaying your personality easier than ever. Plus, once you add the artistry of the coordinating assortments featuring sticker sheets, envelopes, alphabets, cards, and journaling spots, along with your free stamp set, you will be well on your way to your own gorgeous mini book creation! This offer is only available while supplies last and once they’re gone, these books are gone for good, so put your orders in early to get your summer romance rolling today!


* * * * *


June Stamp of the Month
Only $5 with a $50 purchase

To order these or any of the other fabulous CTMH products, please visit my online store at jddesigns.ctmh.com.


Until next time, happy crafting!