About Me

My photo

Independent
Close to my Heart
Consultant

Contact me today to schedule your home gathering or place an order!
Showing posts with label mini album. Show all posts

Monday, May 1, 2017

May Close to My Heart Specials


May Constant Campaign


This year’s National Scrapbooking Month campaign features the Live Beautifully paper packet and stamp set, designed to celebrate your beautiful life.  During the month of May, CTMH is offering three exclusive new products: the Live Beautifully paper packet, the My Acrylix® Live Beautifully stamp set, and the Cut Above™ Live Beautifully layout kit, which helps you create five complete scrapbook layouts in half the time! Buy these exclusive products separately, or buy an album bundle with the new Cut Above layout kit to save 20%—you can also just buy it all!

For Customers: Contest especially for Non-Consultants: Win a brand new Cut Above® layout kit from our Seasonal Expressions 2 idea book! In order to be entered into the drawing, you just need to take a picture of one or more of your completed Live Beautifully Cut Above® layouts with your own photos on them and then share your picture on our Close To My Heart Facebook page between May 1­ - May 31, 2017! We can't wait to see what you create!

For Hostesses: Host a party in May that reaches the third level of Hostess Rewards or higher, and receive the Cut Above™ Live Beautifully layout kit for FREE! I still have May dates available -- contact me today to book yours!

For new Consultants: Become a Close To My Heart Consultant in May and receive the Cut Above™ Live Beautifully layout kit (CC1212A) for FREE!  If you are interested in joining my Designer Therapy team, I would love to help you get started on your CTMH adventure.

* * * * *


May Stamp of the Month
Only $5 with a $50 purchase

To order these or any of the other fabulous CTMH products, please visit my online store at jddesigns.ctmh.com.

Until next time, design with {heart}!

Monday, July 27, 2015

Oh Baby! -- Baby Boy


Warning!!  This post is VERY picture heavy!

This is a continuation of Friday's post, Oh Baby! -- It's a Boy -- which featured a shaker card and pop-up gift card tag.

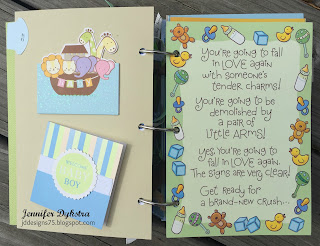
In addition to the group gift I shared with my sisters, I also wanted to make something personal and special for my cousin and her husband from me.  A long time ago, I saw an adorable baby-themed mini album online that had been crafted using the Artbooking Cricut Cartridge (I wish I could remember where online, but sadly, I can't).  I don't traditionally make mini albums, but at the time, I was looking for something I could create using Artbooking to display at my workshops and vendor events.  So I decided to put together a mini using my son's baby pictures.  It was a true labor of love that I will cherish forever.  Anyways... back to my cousins... I love my son's baby mini so much, I decided to make one for my cousins' baby.


Supplies used:
*Artbooking Cricut collection
*Wild Wonders stamp set 
*Slate Exclusive Inks stamp pad
* Diamond embossing folder
*Slate Diagonal ribbon
*Slate Baker's Twine (retired)
*Recollections cardstock / patterned paper from my stash
*1" clear round epoxy circles
*Brads from my stash
*Cork heart from my stash
*Washi tape from my stash
*Ribbon from my stash

To order any of our fabulous Close to My Heart products, please visit http://jddesigns.ctmh.com.

Until next time, happy crafting!

Monday, June 29, 2015

Babies Bring Lots of Joy... and Cards!


After creating my son's birthday card book (post here), I also created this baby-themed card book to house all the cards from my baby showers, my son's birth, and his baptism.  I used a tag punch from my stash and my mini stapler to add file tabs to each divider page that I labeled with the event at which I received the cards.

Front Cover

Tabbed Dividers

Inside Front Cover

For smaller cards, I simply used my ATG to adhere the backs to the divider -- thus still allowing them to be opened.

Inside Back Cover

Back Cover

SUPPLIES USED

*Chipboard
*DCWV Baby Boy 2 stack
*2" binder rings
*Tag punch
*Close to My Heart Mini Stapler
*1" circle punch
*1" round clear epoxy stickers


Happy Crafting!
Jennifer

Saturday, June 27, 2015

Sweet Birthday Wishes & Wet Pup Kisses


Today we are celebrating my son's 4th birthday with family and friends.  He is super excited as he loves having people over to "his" house, and he chose a Paw Patrol themed party.

Today's project is one that has been on my mental project list for a while now.  It will be an on-going labor of love for years to come and solves the problem of what do you do with all the cards your kids receive over the years for birthdays, holidays, and other occasions.  Like I do with our family Christmas cards each year, I made covers and put the cards into a book.  Unlike our Christmas book, this one has much larger rings, and I will add a new divider each year to separate one year's cards from the next.

To make the covers, I cut a piece of chipboard using my paper trimmer (my Cricut would not cooperate!) and sandwiched it between two pieces of cardstock from the DCWV Celebration stack.  Then I measured where I wanted the holes with my 3-hole punch and punched them with a hand punch.

Once the covers were completed, I used my 3-hole punch to punch each card as well as the dividers which I made using pieces of solid-colored cardstock.

Front Cover
(I used the cut apart sheet from the paper collection and more DIY flair.)
Inside Front Cover
Inside Back Cover
Back Cover

SUPPLIES USED

*Chipboard
*DCWV Celebration stack
*2" binder rings
*1" circle punch
*1" round clear epoxy stickers


Hope you have a fabulous weekend.  See you next week for another fun Stamp of the Month Blog Hop.

Happy Crafting!
Jennifer